Iorbar’s Peak is a three-person instance, part of the Road to Erebor instance cluster available either as a standalone purchase or included with the Riders of Rohan expansion. The instance can be run at two different tiers and from level 20 up to the level cap. Loot consists of bounties and relics as well as equipment drops starting at level 50 and scaling to the level of the instance. The challenge quest is available to characters at the level cap, on tier II, at any instance level.
The instance takes place on top of the Misty Mountains at the home of stone-giants. There are two main bosses for this instance, the Dwarf brigand Guthfinn and the stone-giant Helf who has stolen an eagle egg and plans to make an omelet. Ascend the mountain and defeat Helf to preserve the eagle egg.

Part one
You’ll find mainly Dwarf brigands and saber-tooths on your way to the first boss, and you’ll also encounter Helf twice to give you a preview of the boulder-throwing mechanic.
From the entrance, two Dwarves sit around a camp fire pondering the tenuous relationship between the Dwarves and the stone-giants. Feel free to run past them before they finish talking. Take either the right or left path; they both lead onwards. Pay attention to mob debuffs: attack Dourhand Menders from range or with tactical skills and Brawlers with melee attacks to finish them off quickly.
At the top of the first switchback, you’ll meet Helf who greets you by throwing boulders. The locations where the boulders will land are marked with orange circles. The boulders will hurt both players and enemies so use them to your advantage. Continue on up the path defeating anything you come across and eventually you’ll reach Guthfinn.
Part one – mobs

Dourhand Menders – attack them from ranged/tactical, heals allies
Dourhand Shadow-callers – has an aura which buffs allies’ damage, can drop a purple, shadow DoT cloud around a player
Dourhand Brute – attack from melee or get a nasty debuff to damage and healing
Boss one – Guthfinn
 Guthfinn is a simple boss and adds fight with the added mechanic of the giants which have AoE damage and a knockback when you get near them (similar to Grudom in the Great Goblin Throne Room).
Guthfinn has a few special attacks during this fight which will also make it a bit more complicated. In addition to summoning four sets of adds, he can command the giants to run around causing AoE damage to those they run into, command the giants to rain boulders on a specific target and on tier 2 he can place a powder keg on the ground which will explode a few seconds later.
As you may have experienced with previous boulders, they damage players as well as enemies; the same is true here. Have the tank position the boss and the adds in the boulder hotspots, but if you don’t have a healer, just tank the boss as normal, avoid the boulders and giants and have the DPS attack the adds when they show up.
Be careful when the adds show up; they won’t aggro if you’re out of their line of sight, so if your tank is out of the LOS, but the healer is exposed, the adds will run straight for the healer. Luckily the adds are all normal type rather than the signature and elite versions you saw earlier.
Special attacks

- Summons adds (85, 65, 45, 20% morale)
- 2 Brawlers
- 1 Brawler+Mender
- 1 Mender+Shadow-caller
- 1 Shadow-caller+Brute
- Giants run around causing AoE damage and knockback
- Giants throw boulders at a specific target with an “eye” debuff
- Tier II only: Powder Keg – drops a barrel, explodes seconds later
Part two – mobs
Mountain goats – can charge and stun upon aggro, interruptable
Snow Mammoths – can knockback
Powder-workers – will explode their kegs, avoid the DoT hotspot
Bears – can lower armour value
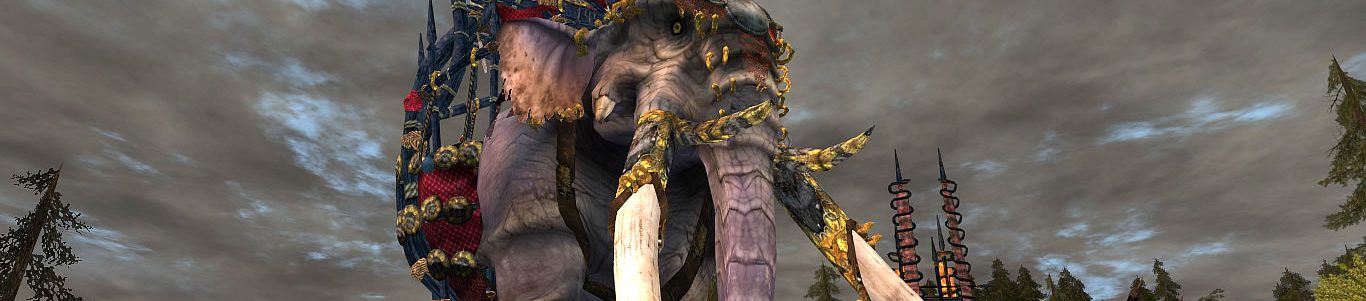
Boss two – Helf
 Helf is probably the easiest of the bosses you’ll encounter in the 3-person Erebor instances. He’s a slow-moving giant and his attacks are predictable. Take your time, pay attention and he’ll fall quickly. This is a simple boss plus four waves of adds fight.
If the adds reach the egg, the egg gets damaged as indicated by the UI element that pops up when you start the fight. On the third hit to the egg from either adds or Helf’s Rocky Exterior attack (Tier II only), the fight ends and resets. If you manage to wipe, there will be a sled at the beginning of the instance to get you back into the action quickly.
This fight is ideal with two ranged DPS and one tank. Have your tank position Helf away from the rest of your group, and make sure your DPS has a clear view of the stone-giant huts where the adds appear from, preferably standing on the eagle egg.
The challenge mode for this fight requires you to defeat Helf without any damage to the eagle egg. You must be level 85 and run the instance on tier 2 at any level to get the challenge quest.
Special attacks

- Summon adds (80, 60, 40, 20% morale)
- Tier I: 1, 1, 2, 2, allies
- Tier II: 2, 2, 3, 4 allies
- Phase changes (75, 50% morale)
- Phase 2 – Starts using Heavy Stomp
- Phase 3 – Starts using Thunder clap and on Tier II, Rocky Exterior
- Hammerfists – phase 1 – Frontal AoE + stun
Helf raises his arms above his head
Run through his legs to his back side or to his side to avoid this - Boulder Toss – phase 1 – AoE damage centered on a player
Targets a player who doesn’t have aggro, tosses a boulder in that location
Run out of the glowing orange circle - Heavy Stomp – phase 2 – AoE, leaves a DoT hotspot
Helf raises his leg in preparation
Run a few meters away from him to avoid - Thunder clap – phase 3 – distributed damage + stun
Helf swings his arm around
Run a few meters away to avoid - Tier II only: Rocky Exterior – phase 3 – morale bubble, damages egg if it expires
Helf gains a glowing green shield
Normal DPSing should be enough to deplete his bubble
”Come, my allies! Crack the egg at all costs!”
”Bothersome insects! Stay away from my egg!”
”Curse the eagles and their allies! You cannot defeat me!”
”Stand before my avalanche of strength!”
”This mountain will quake under my foot!”
”Gather to me, little ones, and hear my applause.”
”My skin is stone and my roar is booming thunder!”
Differences on Tier II
- Guthfinn uses Powder Keg – drops a barrel, explodes seconds later
- Helf uses Rocky Exterior – morale bubble, will damage the eagle egg if not damaged and destroyed
- Tier II challenge: defeat Helf without any damage to the eagle egg
Loot
See this post or this spreadsheet for level 85 values of equipment loot. Equipment loot can drop starting at level 50 and scales accordingly and only drops from the final chest and challenge chest. Rare (purple), incomparable (teal) and epic (gold) loot can drop from the final chest and epic loot can drop from the challenge chest. Loot has a higher chance of dropping on tier II.
Updated and verified: LOTRO Update 9, January 2013.

This is just a fantastic guide–top notch! Do you plan to do guides for the other Road to Erebor spaces?
LikeLike
They’re in the works. I just need more time to spend exploring them fully then compiling all the data into a nice guide.
LikeLike
This guide is really simple and cool. Thanks for writing it 🙂
LikeLike
[…] http://lotrostrategery.wordpress.com/2012/12/31/instance-guide-iorbars-peak/ […]
LikeLike